Canva is one of the most popular design tools for bloggers, marketers and website owners. However, many users export images with the wrong settings, creating large file sizes that slow websites and hurt SEO. In this guide, you’ll learn the best Canva export settings for SEO to improve website speed, image quality and search engine performance.
What Are Canva Export Settings?
Canva export settings determine how your design is saved when you download it.
These settings affect:
- Image quality
- File size
- Website speed
- User experience
- SEO performance
Choosing the right settings can make a significant difference.
Why Image Optimization Matters for SEO
Google considers page speed an important ranking factor.
Large images can:
- Slow page loading
- Increase bounce rates
- Hurt mobile performance
- Reduce Core Web Vitals scores
Optimized images help websites load faster and rank better.
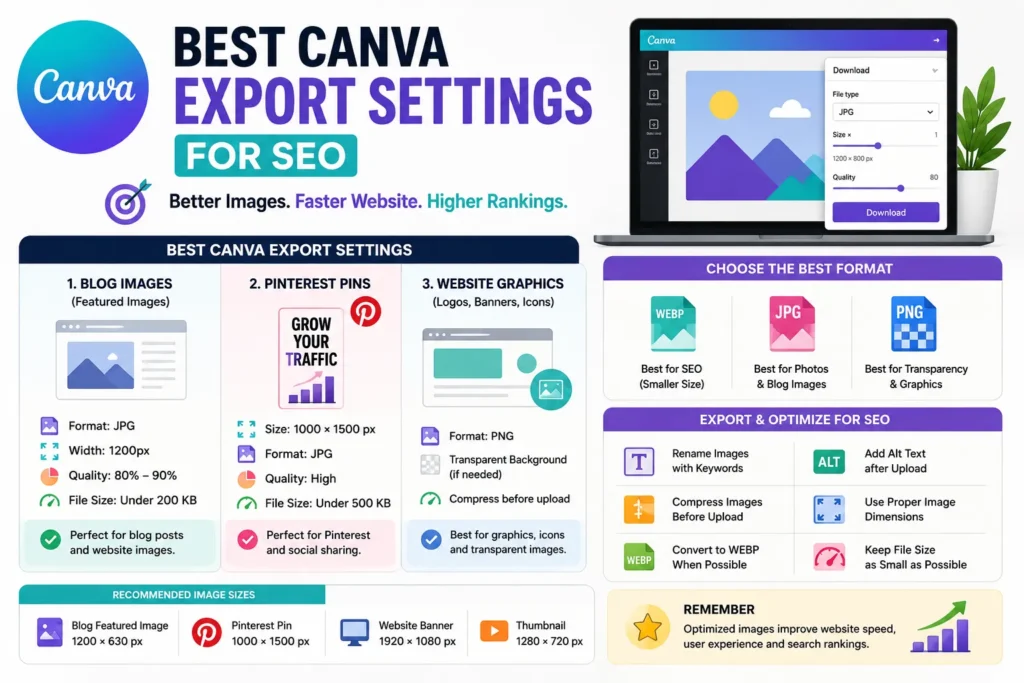
Best Canva Export Format for SEO
| Format | Best Use |
|---|---|
| WEBP | Best overall for SEO |
| JPG | Photos and blog images |
| PNG | Transparent graphics |
Whenever possible, convert Canva exports to WEBP before uploading them to your website.
Best Canva Export Settings for Blog Images
For most blog featured images:
- Format: JPG
- Width: 1200px
- Quality: 80%–90%
- File Size Target: Under 200 KB
This provides a good balance between quality and speed.
Best Canva Export Settings for Pinterest
Pinterest prefers vertical images.
Recommended settings:
- Size: 1000 × 1500 px
- Format: JPG
- Quality: High
- File Size: Under 500 KB
This helps maintain quality while keeping loading times reasonable.
Best Canva Export Settings for Website Graphics
For icons, banners and graphics:
- Format: PNG
- Transparent Background (if needed)
- Compressed before upload
Avoid uploading oversized graphics.
Use WEBP for Better SEO
Many SEO experts now convert Canva images into WEBP format.
Benefits include:
- Smaller file sizes
- Faster loading speeds
- Better Core Web Vitals
- Improved user experience
WEBP often reduces image size by 25–50% compared to JPG.
Rename Images Before Uploading
Don’t upload files with default names.
Bad Example:
canva-design-12345.jpg
Good Example:
best-canva-export-settings-seo.webp
Descriptive file names improve image SEO.
Add Alt Text After Uploading
Alt text helps Google understand images.
Example:
Best Canva export settings for SEO and website speed
Keep alt text descriptive and natural.
Compress Canva Images Before Publishing
Even optimized Canva exports should be compressed.
Popular tools include:
- TinyPNG
- Squoosh
- ImageOptim
Compression further reduces file size without noticeable quality loss.
Recommended Image Sizes for SEO
| Image Type | Recommended Size |
|---|---|
| Blog Featured Image | 1200 × 630 px |
| Pinterest Pin | 1000 × 1500 px |
| Website Banner | 1920 × 1080 px |
| Thumbnail | 1280 × 720 px |
Common Canva Export Mistakes
- Exporting extremely large PNG files
- Uploading images without compression
- Using random file names
- Ignoring alt text
- Uploading images larger than necessary
- Not converting to WEBP
SEO Checklist for Canva Images
- Choose the correct export format
- Use appropriate image dimensions
- Compress images before uploading
- Rename files with keywords
- Add descriptive alt text
- Convert to WEBP when possible
FAQ
What is the best Canva export format for SEO?
WEBP is generally the best option because it offers smaller file sizes and excellent quality.
Should I use PNG or JPG from Canva?
JPG is usually better for blog images, while PNG is useful for transparent graphics.
Do Canva image file names matter?
Yes. Descriptive file names help improve image SEO.
Should Canva images be compressed?
Yes. Compression improves page speed and SEO performance.
Conclusion
The best Canva export settings for SEO focus on balancing image quality and file size. By using the correct format, compressing images, choosing proper dimensions and optimizing file names, you can improve website speed, user experience and search engine rankings.