Website owners, bloggers and creators often struggle between reducing image size and maintaining image quality. Compressing images improves website speed, but too much compression can make images blurry. In this guide, we will compare image compression vs image quality and explain how to balance both for better SEO and user experience.
Quick Answer
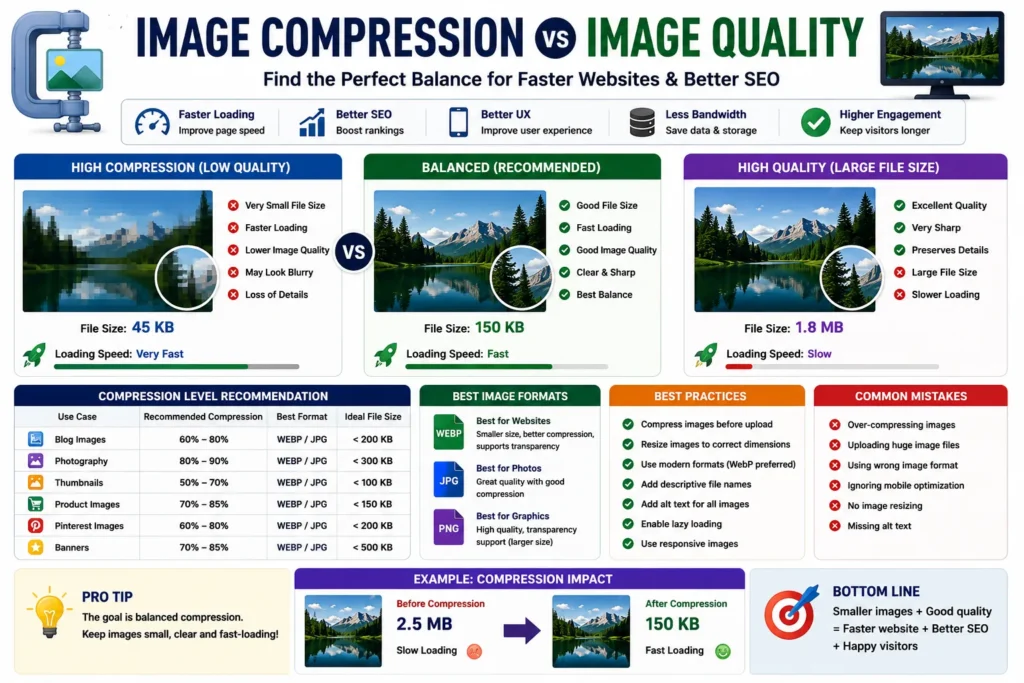
The best approach is balanced compression — reducing image size enough for fast loading while keeping image quality visually clear.
Why Image Compression Matters
Large image files slow websites and hurt SEO performance.
Compressed images help:
- ✔ Improve page speed
- ✔ Reduce bandwidth usage
- ✔ Improve mobile performance
- ✔ Improve Core Web Vitals
- ✔ Reduce bounce rate
👉 Faster websites usually rank better in Google.
What Is Image Compression?
Image compression reduces file size without changing image dimensions.
Main goal:
- ✔ Smaller file size
- ✔ Faster website loading
- ✔ Better performance
What Is Image Quality?
Image quality refers to how sharp, detailed and visually clear an image looks.
High-quality images:
- ✔ Look professional
- ✔ Improve user experience
- ✔ Increase engagement
But very high-quality images often create huge file sizes.
Image Compression vs Image Quality
| Feature | High Compression | High Quality |
|---|---|---|
| File Size | Smaller | Larger |
| Website Speed | Faster | Slower |
| Visual Quality | Lower | Better |
| SEO Performance | Better Speed | Better Visuals |
| User Experience | Depends on quality | Usually better |
Why Balance Is Important
Too much compression creates blurry images.
Too little compression creates slow websites.
👉 The goal is finding the best balance between speed and quality.
Best Compression Levels
| Use Case | Recommended Compression |
|---|---|
| Blog Images | 60% – 80% |
| Photography | 80% – 90% |
| Website Thumbnails | 50% – 70% |
| Product Images | 70% – 85% |
Best Image Formats for Compression
1. WEBP (Recommended)
- ✔ Excellent compression
- ✔ Smaller file sizes
- ✔ Better SEO performance
2. JPG / JPEG
- ✔ Good balance
- ✔ Widely supported
- ✔ Great for photography
3. PNG
- ✔ Better graphics quality
- ✔ Transparency support
- ❌ Larger file sizes
Best Practices for SEO-Friendly Images
- ✔ Compress images before upload
- ✔ Use WEBP format when possible
- ✔ Resize oversized images
- ✔ Keep blog images under 200 KB
- ✔ Add proper alt text
- ✔ Use descriptive file names
Common Mistakes
- ❌ Over-compressing images
- ❌ Uploading huge image files
- ❌ Using wrong image format
- ❌ Ignoring mobile optimization
- ❌ No image resizing
Best Image Compression Tools
- ✔ TinyPNG
- ✔ Squoosh
- ✔ ImageOptim
- ✔ Canva
- ✔ Photoshop
Example of Compression Impact
| Before Compression | After Compression |
|---|---|
| 2.5 MB JPG | 180 KB WEBP |
| Slow loading | Fast loading |
| High bandwidth usage | SEO-friendly performance |
Pro Tips
- ✔ Test image quality after compression
- ✔ Avoid maximum compression settings
- ✔ Use responsive image sizes
- ✔ Optimize every image before upload
- ✔ Monitor website speed regularly
Use Our Free File Renaming Tool
If you want SEO-friendly image file names, use our free tool:
- ✔ Bulk image renaming
- ✔ SEO-friendly names
- ✔ Instant preview
- ✔ No upload required
👉 Optimize Image File Names Now
FAQ
Q1: Does image compression hurt quality?
Too much compression can reduce image quality.
Q2: What is the best image format for compression?
WEBP usually provides the best balance.
Q3: Should I compress website images?
Yes, image compression improves website speed and SEO.
Q4: What is the ideal image size for SEO?
Usually under 200 KB for blog images.
Conclusion
When comparing image compression vs image quality, balance is the key. Optimized images should load fast while still looking clear and professional. Proper compression improves SEO, website speed and user experience without sacrificing visual quality.